
 Save
Save
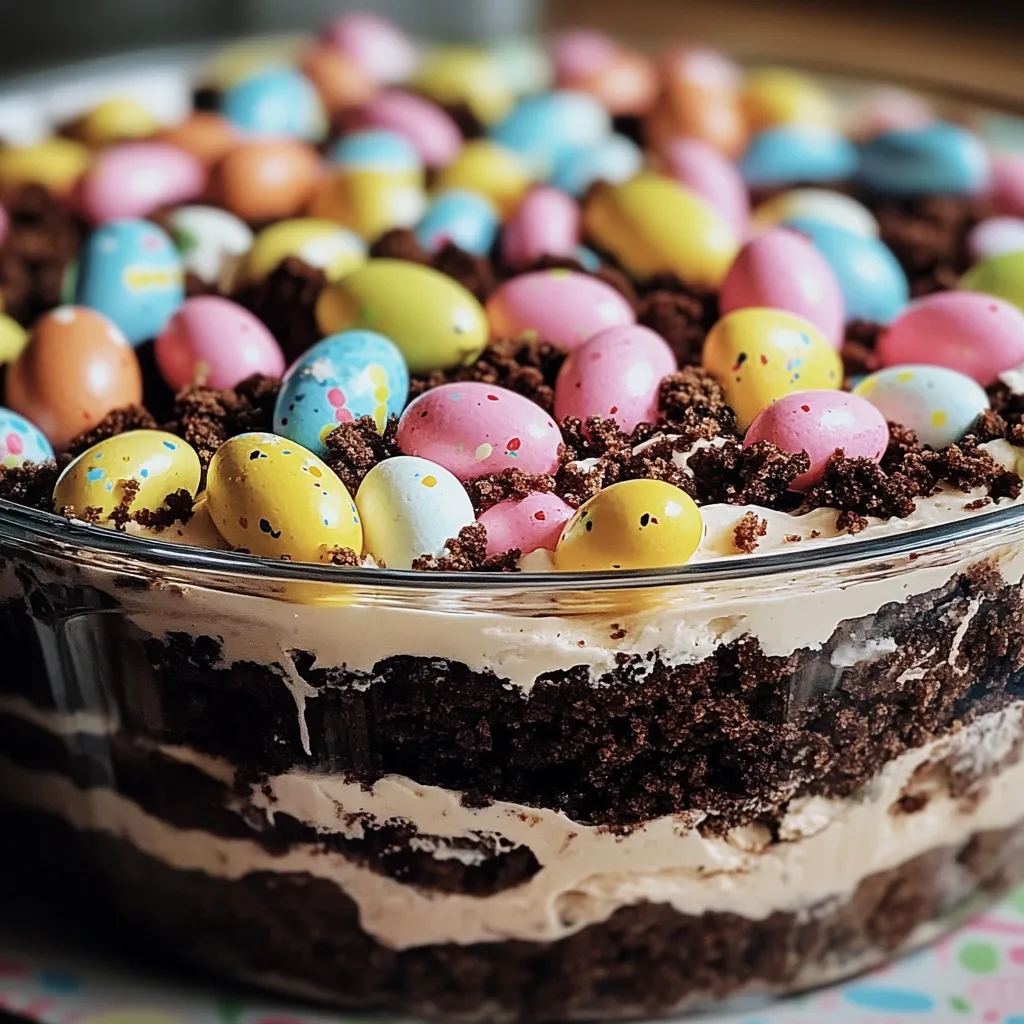
This playful dirt cake casserole brings together easy-to-find stuff for a dessert that’s just as fun to look at as it is to eat. You’ll get creamy pudding layers sandwiched with crushed-up cookies, topped with bright candies and treats for a cheery spring scene. No oven needed—just mix, layer, and it’s done. You get that dreamy blend of smooth and crunchy in each bite, and it always steals the show at springtime get-togethers. The best part? It only looks hard—actually, it’s a quick project anyone can handle, but everyone thinks you spent all day making it.
I started making this for my kid’s spring birthday and the way the little ones’ eyes lit up told me I’d nailed it. The funniest part? The adults stuffed their faces too—even my brother, who swears he “doesn’t do desserts,” went back for thirds and wanted the directions. Now everyone in my family competes for the coolest candy scene on top. Last year, my nephew’s lineup of Peeps and jelly bean fans took home the bragging rights.
Charming Ingredients
- Easter candies: Go wild with whatever shapes and colors you like for decorating—mix textures for extra fun
- Chocolate sandwich cookies: Smash these for your “dirt” layers; classic or chocolate cream both work awesome
- Whipped topping: Adds fluffy lightness—real whipped cream is fine but won’t stay as sturdy
- Butter: Brings it all together and makes the mix rich; use unsalted so you don’t get salty bites
- Instant vanilla pudding: This is the star of the creamy part; use standard or go French vanilla for more zing
- Powdered sugar: Sweetens the filling and dissolves easily—sift first if you want it super smooth
- Cream cheese: Makes everything creamy with a slight tang; full-fat is the richest, but lighter is fine
- Shredded coconut: Great for turning into “grass”—sweetened coconut grabs color the best
- Green food coloring: Use it to make coconut grass—gel colors look brightest
- Milk: Whisks into the pudding mix to get it thick and silky; any kind of milk works, but whole is richest
Step-by-Step Guide
- Chill time:
- Cover with plastic wrap, making sure it’s not pressing on your cute decorations. Let it sit in the fridge for at least two hours—overnight is even better—so everything firms up and tastes just right.
- Dress it up:
- Now for the best part: pop your candies on top. Nestle chocolate eggs in the “dirt,” plant marshmallow chicks in the green coconut, toss on jelly beans wherever you like. Play with chocolate bunnies, pastel treats, or even edible flowers to make it pop.
- Coconut grass:
- If you want that grassy look, dump about a cup and a half of shredded coconut in a bag. Add a few drops of green food coloring, seal, then squish it around till the color’s all over. Sprinkle on wherever you want a grassy patch, making little piles for more texture.
- Topping with dirt:
- Take the rest of those cookie crumbs and sprinkle over part of the top—don’t cover it all if you want spots for “grass.” It’ll look way cooler with a mix of coconut and dirt patches.
- Create the creamy mix:
- In a big bowl, beat room-temp cream cheese and soft butter with powdered sugar until everything is super fluffy and smooth—no lumps! Scrape down the sides so it’s all even.
- Layering the base:
- Pick a big glass baking dish so you can see all the layers from the sides. Take half your cookie crumbs and spread them across the bottom. Give them a gentle press to make a nice flat dirt patch.
- Pudding magic:
- In another bowl, stir together two boxes of instant pudding with cold milk. Whisk hard for a couple minutes, just till it’s barely thick but still pourable. It’ll keep thickening after this step.
- Blend it all together:
- Add the pudding to your cream cheese mixture. Fold together gently—use a spatula and don’t overmix. Then stir in the whipped topping just until there aren’t any streaks left. Take it easy so you don’t squish the fluff out.
- Cookie crumb crush:
- Blast about two dozen cookies in a food processor till they’re fine crumbs, or seal them in a bag and whack with a rolling pin if you want. Stash half a cup aside for the dirt on top.
- Creamy middle:
- Scoop all your creamy pudding-cheese mix on top of the bottom cookie layer. Gently spread it out, covering the whole thing right into the corners. This is your base for the decorations.
 Save
Save
I used to rush and skip softening the cream cheese, and every time I regretted it—lumpy filling never feels as nice as the silky version. My grandma showed me her trick: lay wrapped cream cheese on a mug filled with warm (not hot) water for about fifteen minutes. It softens up fast with no melting mess. My favorite part is letting kids go wild with toppings. When mine were little, everyone got a section to decorate, which totally stopped fights and led to really creative, silly scenes.
Fun Ways to Serve
It’s easy to make this dessert the star at parties. Set up the base yourself, then let guests add their own candies and toppings—it turns dessert into an activity everyone enjoys. Kids love picking pieces for their own spot, and the grown-ups get into it too. You can make cute, fancy single servings in small jars or trifle cups, with layers you can see all around—no messy scooping at the table. Taking it somewhere? Tuck it in a cooler with ice. Hold off on topping with delicate candies ’til you’re ready to eat so they look their best.
Change It Up
This dessert flexes with the seasons! Swap the candies for fresh berries, edible blooms, and butterfly cookies to make it a summer garden treat—so fresh and creamy. For Halloween, go wild with gummy worms, cookie gravestones, and candy pumpkins for a graveyard scene. You could even tint some cookie crumbs black for extra drama. At Christmas, use peppermint bits, tiny canes, and chocolate Santas, then load up with coconut “snow” on top for major holiday cheer.
Keep It Fresh
To keep everything tasting and looking great, cover with plastic wrap but don’t squish your decorations. Store in the fridge—it stays good for three days, but is best in the first day or two while the cookies still crunch a bit. For making ahead, do all the layers except candies early, stash in the fridge, then pile on decorations right before you serve. If you’re serving this outside, pop the whole thing in a dish of ice and keep out of direct sun, so nothing melts down.
After bringing this dirt cake to my family over the years, I’ve seen how everyone—from little kids to grandparents—can’t resist it. It’s not just that the creamy and crunchy layers are delicious; there’s something about decorating it that sparks fun memories and laughter. Watching someone taste it, thinking it’s just cute, and then realizing “oh wow, this is actually amazing” always makes me happy. It’s become a sweet tradition at our spring celebrations—creative, playful, and full of smiles every single time.
 Save
Save
Recipe FAQs
- → Is it okay to prepare this dessert the day before?
- Sure thing! You can set this up 24 hours ahead. Store it in the fridge until serving time.
- → What’s a good substitute for Cool Whip?
- Homemade whipped cream (around 3 cups) with a bit of gelatin for stability or sweetened heavy cream will work perfectly.
- → Can I skip the shredded coconut?
- Of course! Try using green sprinkles or chocolate shavings with food coloring instead, or just leave it out altogether.
- → Will chocolate pudding work here?
- Absolutely! Chocolate pudding adds a deep, rich flavor that matches beautifully with the cookie layers.
- → What’s the best way to store leftovers?
- Cover the dish with plastic and refrigerate for up to three days. The cookies will soften but still taste amazing.